Thorlabs PMT2100 v2
If you are experiencing connection issues or other errors with the other PMT 2100 implementation, give this implementation a try.
In addition to being tested for reliability in several ScanImage use cases, it also offers slider controls for gain and gain offset from its configuration window.
Hardware Config
Using a powered USB hub capable of delivering 500 mA @ 5V per PMT2100 to be connected, connect the Thorlabs PMT2000 to the computer via a USB-A to USB B mini cable.
Software Config
Install the NI-VISA driver.
Download and install the Thorlabs PMT software and ensure that the PMT is recognized by the Thorlabs software.
Close the Thorlabs PMT control software and add a new device to ScanImage by selecting PMT -> Thorlabs PMT2100 v2 Select the VISA address of the PMT, and select ‘Apply’.
Software Control
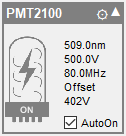
The PMT can be controlled via its widget in the ScanImage widget bar.
Clicking on the PMT icon turns the PMT on or off.
Clicking on the parameters next to the PMT icons allows to change the PMT gain, bandwidth and offset.
