Motor Controller
A motor controller translates or rotates the sample in as many axes as the stage is designed and configured for. Motorized Stage Controllers are typically controlled via a vendor specific command set. ScanImage features several software drivers for communicating with stages.
Note
Motorized stages are moved by software commands and are not tightly synchronized to the acquisition. This limits the speed of stack acquisitions with these types of stages. For acquiring stacks with a continuously moving focus, refer to FastZ.
There are two types of stage drivers in ScanImage:
SI 2020 stage driver |
SI legacy stage driver |
|
Description |
|
|
Recommended |
✓ |
ScanImage 2020 stage drivers
Device |
Comment |
Requires the Zaber Matlab library All devices that support the Zaber ASCII protocol (preferred) or the Binary protocol are supported |
|
Scientifica Motion 1 |
|
Scientifica Motion 2 |
|
Requires Thorlabs Kinesis software |
|
communication over serial connection is unstable; does not support live position update |
|
Any motor that uses an analog signal [-10V,10V] for position control |
|
Marzhauser Tango |
|
ScanImage legacy stage drivers
ScanImage Motor system configuration
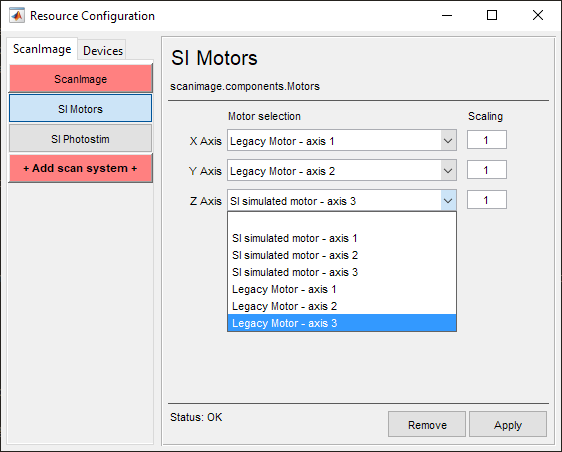
Once a stage device has been added and configured, it can be added to the ScanImage® motor system. In the Resource Configuration window select the ScanImage tab and click the SI Motors button. This will reveal a page (see below) that will allow each of the axes to be configured as an axis of the configured stage.
Note that the ScanImage coordinate system is defined as follows:
The X axis of the sample points to the right of the screen
The Y axis of the sample points to the bottom of the screen
The Z axis points into the sample (away from the objective)
This means moving the stage shall have the following effect:
Incrementing the X axis shall visually move the sample towards the left of the screen
Incrementing the Y axis shall visually move the sample towards the top of the screen
Incrementing the Z axis shall move the sample towards the objective (or shall move the objective towards the sample in case of a moving objective microscope)
Ensure that the stages move the sample according to the above description. If a stage axis is inverted, set the scaling factor of the axis to -1 in the configuration window.
